I wanted to upcycle an old wipe container I was about to throw away with some mod podge but I did not have any. Then I came across this pin, Homemade Mod Podge. So I decided to give it a try. It is very simple, 50% water, 50% white glue, mix it up and there you have it.
You might want to add more glue since I found it a little runny.
So now I had everything I needed to make a new container.
~ old container
~ homemade mod podge
~ scissors
~ brush
~ decorative paper
~ sealer (I paint alot so I always have some on hand)
I simply cut up the paper into the size that would cover the container, put mod podge on the container, placed the paper where I wanted it (one sheet at a time) and brushed more mod podge over it.
*note if you get papaer ripples and/or air bubbles squeeze them out with something flat like a credit card.
I let it dry overnight and then sealed the paper with my triple thick sealer. You can get it in the arcylic paint section at Hobby Lobby for a few bucks.
Then once it was dry it was done! I cut out the plastic in the container lid (the part the holds the wipe in place) since I wanted to use it to hold all of my fabric headbands and large hair barrettes. You could use it to store almost anything really. It was super easy.
I have more pins done so expect more posts to follow in the days ahead.
Beck-terest
An average girl's journey crafting the things she finds on Pinterest.
Your Nav Bar Here
Wednesday, February 1, 2012
Monday, January 23, 2012
I promise I have been doing stuff...
So I have been doing crafts and things from Pinterest and taking pics. The problem is I haven't had to the time to sit down and write about it. I will try to get to it this week :)
I will say I had a Epic Fail when trying to do this pin (marbleize your nails). I'm sure with time and practice you could do it but I made a mess. And I do not care about my nail enough to waste that much time and effort on them.
I will say I had a Epic Fail when trying to do this pin (marbleize your nails). I'm sure with time and practice you could do it but I made a mess. And I do not care about my nail enough to waste that much time and effort on them.
Wednesday, January 4, 2012
Playing with Printables....Free 2012 Calenders
Oh Calenders I love you so.
I use to browse and browse the local Borders during this time of year looking at all of the fun calenders.
But now there is no Borders *tear* so I was uber excited to see this pin...Ten Printable Calenders for 2012!
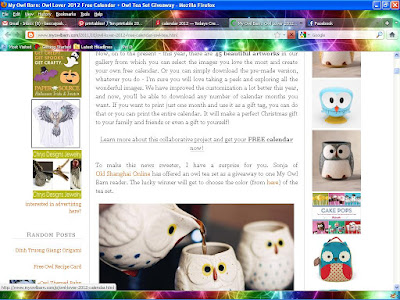
It was simple enough. I went to the link and decided that I liked the owl calender. I clicked on the link and then had to click on another to find the calender.
Once I was at the site I was pleasently surprised to see that I got to choose which owl picture I want for each month...Oh decisions, decisions!
I made my hard choices and then simply had to click Print once my PDF file opened.
All that was left to do was cut out the months. They printed 4 months a page to make a cute small desk calender. Of course, once I cut out all of the months and started to staple them together I noticed that December was still on my desk (oops) and had to rip the staple out. Bummer.
And since this is going on my work station, I put a empty DVD case behind it. You just pop off the clear cover and put it back on backwards. TA-DA done!
I use to browse and browse the local Borders during this time of year looking at all of the fun calenders.
But now there is no Borders *tear* so I was uber excited to see this pin...Ten Printable Calenders for 2012!
It was simple enough. I went to the link and decided that I liked the owl calender. I clicked on the link and then had to click on another to find the calender.
 |
| click on the "learn more" link to get to the calender |
Once I was at the site I was pleasently surprised to see that I got to choose which owl picture I want for each month...Oh decisions, decisions!
I made my hard choices and then simply had to click Print once my PDF file opened.
All that was left to do was cut out the months. They printed 4 months a page to make a cute small desk calender. Of course, once I cut out all of the months and started to staple them together I noticed that December was still on my desk (oops) and had to rip the staple out. Bummer.
And since this is going on my work station, I put a empty DVD case behind it. You just pop off the clear cover and put it back on backwards. TA-DA done!
Saturday, December 31, 2011
Playing with Printables! New Years 2012
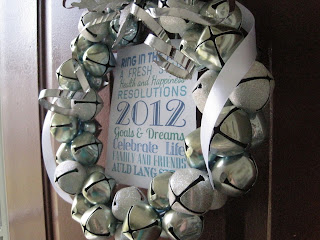
I really loved the free printables I pinned the other day, Subway Art for 2012 New Years. However, I was not sure how I was going to use it. Then it suddenly came to me today...I'll put it in a wreath!
I went to the website and downloaded Ocean (the blue printable). It comes as a 8x10 but I knew that would be too big.
I went to the 'print' button and selected 'page scaling' and from the drop down menu selected 'multipule pages per sheet'.
I then selected 'pages per sheet' and selected '2'. This made my printable half the size of the orginal.
I printed it on a sheet of card stock so it would have more weight.
I went down into the basement and found my blue and silver bells wreath I haven't used in years because it is kind of faded.
Then I cut out the design and taped it to the back of the wreath.
And TA-DA! A New Years wreath!
But once I hung it on my door I noticed that you could see the ugly red magnetic hook on my door.
I am use to this problem. So I just added a white ribbon and New Years Wreath is done! (please don't mind the clipped paint on the door. It is getting repainted this spring).
Thursday, December 29, 2011
First Try...Newsprint Nails
Well I thought that I would try out a seemingly easy project for my first Beck-terest, the Newsprint Nails Pin.
The post seemed simple enough. Paint your nails a light color, put on clear coat, dunk nails in alcohol and then place some newspaper on it. But as we all know, nothing is that simple.
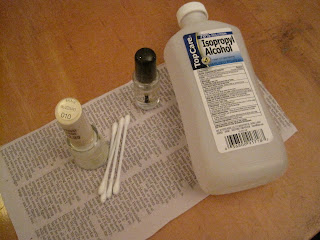
I started with gathering the supplies - white nail polish, clear coat, newspaper and alcohol (plus some Q tips because you never know)...ok that was easy, all of this was in the house so I didn't need to buy anything.
According to the different blogs I have read, your nail polish needs to be completely dry for this to work. Since I know how impatient I am, I did this step the night before.
Then I put on clear coat and waited a few minutes for it to dry. Once dry I dunked my nail in a shot glass of alcohol (not the fun kind of shot-glass-full-of-alcohol).
Tap the extra liquid off your hand and then place the newspaper on your nail.
*TIPS
- Make sure your strip has PLENTY of text on it.
- Also try to get it from an article that will not have any depressing words like "murder" "rape" "child molested" as you probably do not want that on your nail...probably.
- Press the newspaper very hard against your nail with your other hand and do not move it! It will smudge the print (and yes the print will come off backwards).
- If the newspaper sticks to your nail, dip your nail with the newspaper on it into the alcohol. The paper will come off.
My first try turned out pretty good! I was excited.
And then in my excitement I forgot to put on the clear coat on my other hand. And then I smudged the text on a nail. And then...well I needed to have a drink.
But after re-painting a few nails and trying again, I think they came out ok. You HAVE to put on clear coat after you are done transferring the newsprint onto your nails so it does not rub off.
So it was not a complete success but it was also not a complete failure either. Now that I have the hang of it I will most likely try this again.
Subscribe to:
Posts (Atom)

.jpg)
.jpg)
.jpg)
.jpg)
.jpg)
.jpg)


